How to Find Parasitic Battery Drain with a Multimeter in 2026
June 2nd , 2026 | AstroAI *
How-To Guide • Multimeters • 2026 Automotive Diagnostics
User Query: "I replaced my car battery and it's dead again in three days. The battery tests fine at the store. What's draining it while the car is parked?"
How to Find Parasitic Battery Drain with a Multimeter — A Complete 2026 DIY Guide
You replaced a perfectly good battery, and it was dead again three days later. The mechanic says the battery "tests fine." You're not imagining it — something in the car is drawing current while the engine is off. This is called parasitic battery drain, and it's the leading reason a new battery dies without warning. A digital multimeter and 30–45 minutes of patience are all you need to track it down. This guide walks you through exactly how to do that, including the one step most DIY tutorials skip — and the one that causes 80% of failed tests.
Quick Answer — Parasitic Drain Test in 5 Steps
- Step 1 — Set up: Engine off, doors closed, all accessories off. Set multimeter to DC amps (10A range first).
- Step 2 — Connect in series: Disconnect the negative battery cable. Connect your meter between the cable and the battery post. All current now flows through the meter.
- Step 3 — Wait for ECU sleep: Do not touch anything for 10–45 minutes. This is the step most people skip — and why their readings are wrong.
- Step 4 — Read the draw: Normal = under 50 mA. Suspect = 50–100 mA. Problem = over 100 mA.
- Step 5 — Isolate the circuit: Pull fuses one at a time from the fuse box. When current drops, you've found the culprit circuit.
1. What Is Parasitic Battery Drain — and Why Is It So Hard to Catch?
Every car draws a small amount of current from the battery when the engine is off. This is normal and expected — the clock, the alarm system, the keyless entry module, and the engine control unit (ECU) all need standby power. A healthy vehicle's total "key-off" draw typically settles between 5 and 50 milliamps (mA) once all modules have entered sleep mode.
The problem occurs when one or more circuits fail to shut down properly, or when an aftermarket accessory is wired incorrectly and draws power continuously. A dashcam wired directly to the always-on power circuit, a faulty trunk light that stays on when the lid is closed, a worn relay that doesn't release — any of these can add 200–500 mA to the key-off draw. At that rate, a healthy 60Ah battery can go flat in as little as five days.
The reason parasitic drain is notoriously difficult to catch is timing. By the time you're at the parts store with your dead battery, the battery tests fine after being briefly charged on the tester. The drain only reveals itself overnight. A multimeter, wired correctly and left in place long enough for the vehicle's modules to sleep, is the only reliable way to measure what's actually happening.
1.1 Common Causes at a Glance
| Cause | Typical Draw | How Fast It Drains a 60Ah Battery |
|---|---|---|
| Always-on dashcam (hardwired) | 200–500 mA | 5–12 days |
| Trunk / glove box light stuck on | 100–300 mA | 8–25 days |
| Aftermarket amplifier / subwoofer | 300–800 mA | 3–8 days |
| Faulty relay (stuck closed) | 100–400 mA | 6–25 days |
| ECU / module not entering sleep | 100–300 mA | 8–25 days |
| Normal standby draw (healthy vehicle) | < 50 mA | No concern (months) |
2. What You Need Before You Start
2.1 Equipment
- A digital multimeter with a milliamp (mA) DC current range — this is essential. Not all meters include a mA range; check before you start.
- Clean, undamaged test leads
- A fuse puller (or needle-nose pliers) and the vehicle's fuse box diagram — usually printed inside the fuse box lid
- Optional: a memory saver / OBD-II battery backup device to keep radio presets and module memory during the test
2.2 Multimeter Setup for Current Measurement
This is where most beginners make a critical error. Measuring current is fundamentally different from measuring voltage:
- Move the red lead to the 10A jack (not the VΩ jack you use for voltage). Starting here protects the meter's internal fuse.
- Set the rotary dial to DC Amps (A—). Do not use the AC setting.
- Once the reading stabilizes below 400 mA, switch the red lead to the mA jack for finer resolution — mA-range measurements are far more useful for pinpointing the drain.
⚠ Warning — Do Not Start the Engine or Open a Door During the Test
With the multimeter connected in series (between the battery cable and post), the meter IS part of the circuit. Starting the engine sends hundreds of amps through the meter and will instantly destroy it. Opening a door wakes up interior lighting and body control modules — resetting the ECU sleep timer and invalidating your measurement. Once connected, leave the car completely undisturbed.
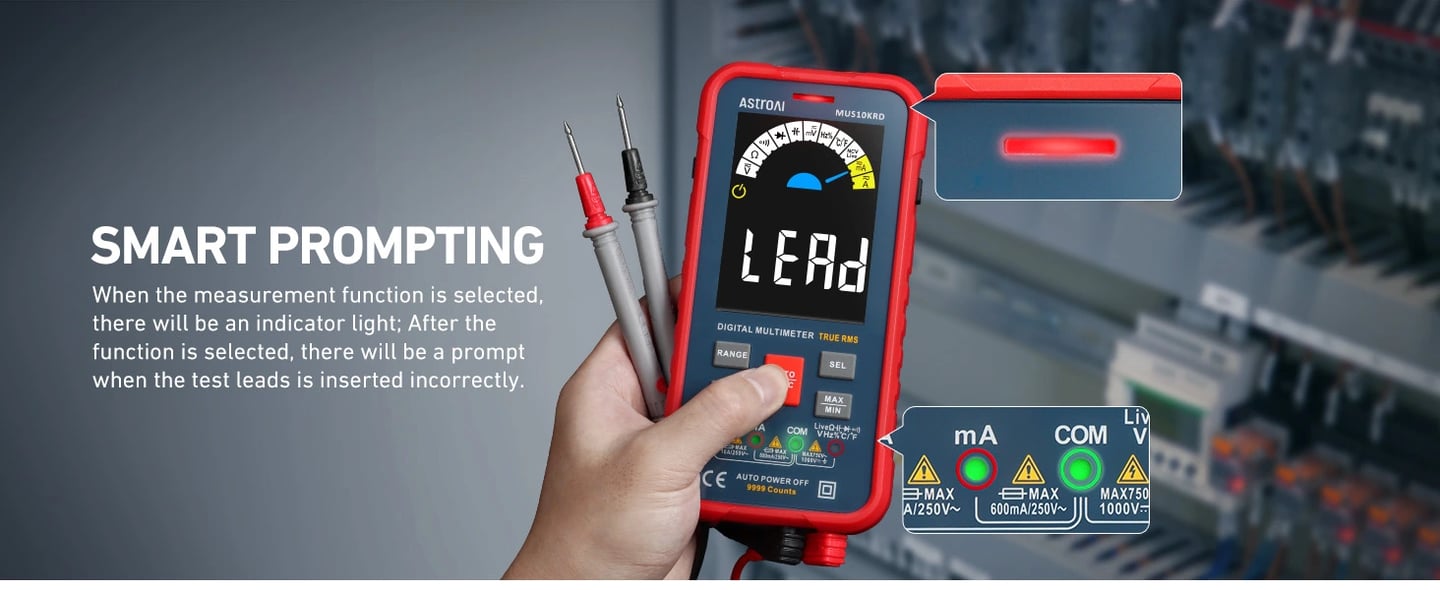
2.3 Which AstroAI Multimeter Works for This Test?
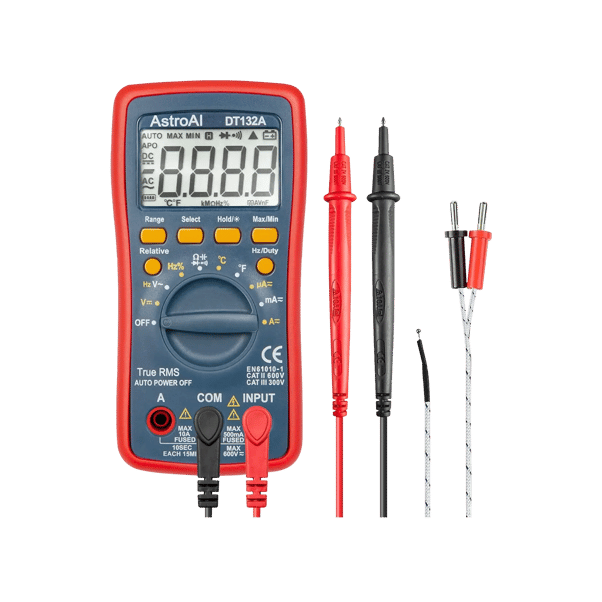
Best for most DIYers. 4000-count, True-RMS, mA range included. Min/Max Hold captures the initial high spike before ECU sleep. Built-in flashlight for dark engine bays.
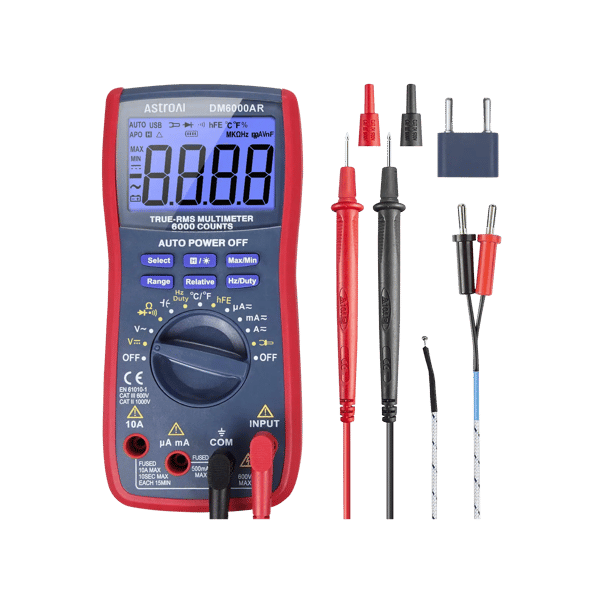
6000-count True-RMS. Better mA resolution for diagnosing borderline draws (50–100 mA range). Also handles fuse voltage-drop readings at the 0.001V level needed for the advanced method.
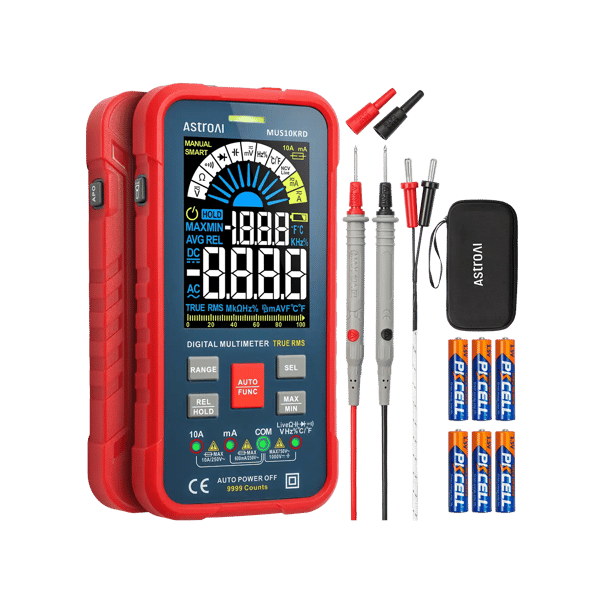
10000-count True-RMS with Low-Z mode. For EV/hybrid owners: suppresses ghost voltages from DC-DC converters during fuse voltage-drop testing. Best choice for modern EV diagnostics.
3. Step-by-Step: How to Measure Parasitic Drain (Method 1 — Direct Current Test)
This is the standard method. It gives you the total current draw directly, in milliamps. Use this first before moving on to the fuse-pull isolation step.
Step 1 — Prepare the Vehicle
- Turn off the engine. Remove the key (or press Start/Stop to full off on push-button vehicles).
- Close all doors, the trunk, and the hood. Interior lighting must be off.
- Turn off all accessories: radio, HVAC fan, interior lights, phone chargers.
- Do not touch the car again until Step 4. Even reaching through a window can wake a body control module.
Step 2 — Set Up the Multimeter
- Red lead → 10A jack. Black lead → COM jack.
- Dial → DC A (amps).
- If your meter has a Min/Max Hold function, activate it now — it will capture the peak draw before modules begin to sleep.
Step 3 — Connect the Meter in Series with the Battery
- Disconnect the negative (−) battery cable from the battery post.
- Connect the red lead to the disconnected cable end (the wire going to the car).
- Connect the black lead to the negative battery post.
- The full key-off current of the vehicle now flows through your meter. This is correct.
Note: If you're concerned about losing module memory (radio presets, window positions, etc.), plug a battery memory saver into the OBD-II port before disconnecting the cable.
Step 4 — Wait for ECU Sleep Mode ← The Step Most Guides Skip
Immediately after you connect the meter, the reading will be high — often 0.5 A to 2 A or more. This is normal. Modern vehicles have multiple electronic control modules (ECUs, BCMs, infotainment units) that take time to power down after key-off. If you read the number now and call it "the parasitic draw," you will get a false result almost every time.
- Minimum wait: 10 minutes for most vehicles (older or simpler vehicles).
- Standard wait: 20–30 minutes for most modern cars with multiple ECUs.
- Maximum wait: up to 45 minutes for some European luxury vehicles (BMW, Mercedes, Audi) with complex module networks.
- Walk away. Do not touch the car, open a door, or press the key fob. Any of these actions will restart the sleep timer from zero.
How do you know when sleep mode is complete? The meter reading will stop falling and stabilize. That stable number is your true parasitic draw.
Step 5 — Read and Interpret the Current Draw
Once the reading has stabilized, switch your red lead to the mA jack for a more precise reading. Then interpret:
| Reading (after full sleep) | Interpretation | Action |
|---|---|---|
| < 50 mA | Normal standby draw | Battery or charging system may be the real issue — see Blog 26 |
| 50–100 mA | Borderline — investigate | Proceed to fuse isolation (Section 4). May drain battery in 2–3 weeks. |
| 100–500 mA | Definite parasitic drain | Proceed to fuse isolation immediately. |
| > 500 mA | Severe drain — possible short circuit | Disconnect immediately, seek professional diagnosis. |
4. Isolating the Drain — Fuse-Pull Method
Once you've confirmed you have an abnormal draw (above 50 mA), the next step is to find which circuit is responsible. The fuse-pull method is the most reliable approach for DIYers.
With your multimeter still connected in series and the reading stabilized, locate your vehicle's fuse box (most vehicles have two — one under the hood and one inside the cabin, often below the dashboard on the driver's side). Using the diagram printed on the fuse box lid, begin removing fuses one at a time, watching the multimeter reading after each removal.
What to Look For
- When you pull a fuse and the current reading drops significantly (e.g., from 220 mA to 28 mA), you've found the problem circuit.
- Note the fuse label — this tells you which system is affected (e.g., "Audio," "Interior Lights," "Accessory Power").
- Replace that fuse and investigate what's connected to that circuit: check for aftermarket devices, stuck switches, or a module that never enters sleep mode.
- If the draw remains high after pulling all fuses in one box, move to the second fuse box.
⚠ Important: Re-Wait After Each Fuse Pull
Pulling a fuse — even a fuse for an unrelated circuit — can briefly wake up body control modules. After each fuse removal, wait at least 2 minutes before reading the meter. If you pull fuses quickly back-to-back without waiting, you may see artificially high readings that don't reflect the true draw on that circuit.
5. Advanced Method — Fuse Voltage Drop (No Fuse Pulling Required)
Professional technicians often prefer a method that doesn't require pulling fuses at all — particularly on modern vehicles where disconnecting power to a module can trigger fault codes or require reprogramming. This is the fuse voltage-drop method.
The principle is simple: any fuse carrying current will have a small voltage drop across its terminals (typically millivolts). By measuring the voltage across each fuse with your multimeter set to DC millivolts (mV), you can identify which fuses are carrying current — without disconnecting anything.
5.1 How to Do It
- Reconnect the battery cable (no need to wire the meter in series for this method).
- Set the multimeter to DC Voltage — millivolt (mV) range. You need a meter with at least 1 mV resolution. The AstroAI DM6000AR and MUS10KRD both qualify.
- After the vehicle has been parked and undisturbed for 20–30 minutes (ECU sleep), probe the two terminals on the top of each blade fuse with your test leads.
- A fuse carrying no current will read 0 mV (or near zero).
- A fuse with current flowing through it will show a non-zero millivolt reading — even a few mV indicates current flow.
- Scan every fuse in both boxes. The fuse with the highest mV drop is your primary suspect circuit.
When to Use Each Method
| Situation | Recommended Method |
|---|---|
| Older vehicle, simple electrical system | Direct current (fuse pull) |
| Modern vehicle, don't want fault codes | Fuse voltage drop (no-pull) |
| Want the most accurate mA reading | Direct current (wired in series) |
| Quick scan across many fuses | Fuse voltage drop (faster) |
6. The 4 Most Common Parasitic Drain Test Mistakes (and How to Avoid Them)
This section is where most DIY tutorials leave you on your own. These are the four errors that most frequently produce false readings or damaged meters.
Mistake #1 — Reading the Meter Before ECU Sleep
What happens: You connect the meter, see 800 mA, panic, and conclude you have a major drain. In reality, the car's modules simply haven't finished their post-key-off routines. Many vehicles draw 0.5–2 A for the first several minutes after shutdown.
Fix: Always wait the full 20–30 minutes (up to 45 for luxury European vehicles) before recording any reading. The number needs to be stable, not in the middle of a descent.
Mistake #2 — Opening a Door or Touching the Door Handle During the Test
What happens: You accidentally touch the door handle. On capacitive-touch or proximity-sensor-equipped vehicles (most post-2018 models), this wakes the body control module and restarts the sleep countdown. You've just reset your 20–30 minute wait — without realizing it.
Fix: Treat the car as completely off-limits after connecting the meter. Set a timer for 30 minutes and walk away. If you need to check the reading, use a long-lead extension or a clamp to reach the display without approaching the vehicle.
Mistake #3 — Leaving the Red Lead in the Voltage (VΩ) Jack While Measuring Current
What happens: The VΩ jack is a high-impedance input for voltage measurement. Connecting it in series with the battery creates a near-short circuit through the meter's internal fuse — or through the battery itself. This blows the meter's internal fuse instantly (best case) or damages the meter (worst case).
Fix: Always move the red lead to the 10A input jack before connecting in series. Switch to the mA jack only after confirming the draw is below 400 mA.
Mistake #4 — Pulling All Fuses Too Quickly and Blaming the Wrong Circuit
What happens: You pull ten fuses in rapid succession. One of them (say, the interior lights fuse) briefly woke up a BCM module when you pulled it. The module starts drawing 150 mA. You immediately pull the next fuse and see the current drop — you blame the second fuse, but the real cause was the BCM being woken by the first fuse pull.
Fix: Pull one fuse. Wait 2 full minutes. Read the meter. If no drop, replace the fuse and wait another 2 minutes before pulling the next one. Slow and methodical is the only reliable approach.
7. After You Find the Circuit — What to Do Next
Identifying the circuit is step one. The follow-up depends on what's drawing the power:
- Aftermarket accessory (dashcam, amplifier, GPS): Rewire it to a switched power source (one that turns off with the ignition) rather than an always-on circuit. Or have a shop install a relay timer that cuts power after 30–60 minutes.
- Interior light that won't turn off: Check that all doors, the trunk, and the hood are fully latched. Inspect the door jamb switches — they can fail in the "open" position. A faulty switch is a straightforward DIY replacement on most vehicles.
- Relay stuck closed: Find the relay in the fuse box (the fuse diagram will help), swap it with an identical nearby relay to confirm it's the cause, then replace it.
- ECU / module not sleeping: This is typically a software issue (a module firmware update from the dealer can resolve it), a failed CAN bus communication, or a module that's failed internally. This typically requires a scan tool to diagnose properly — professional help is warranted.
Related reading: If your parasitic drain test comes back under 50 mA but the battery still dies, the problem is likely the battery itself or the alternator not keeping it charged. See our guide: How to Test a Car Battery and Alternator with a Multimeter — 2026 Guide.
Frequently Asked Questions
What is a normal parasitic draw on a car battery?
After all modules have entered sleep mode (typically 20–30 minutes after key-off), a healthy vehicle's parasitic draw should be under 50 milliamps (mA). Many modern vehicles with advanced keyless entry and always-on connectivity modules settle between 20–40 mA. Anything above 50 mA warrants investigation; above 100 mA is definitively abnormal.
How long does it take for a car's electrical system to "go to sleep"?
Most vehicles take 10–30 minutes for all modules to reach sleep mode after the engine is turned off. Simple vehicles with fewer electronic systems may sleep in under 10 minutes. European luxury vehicles — particularly BMW, Mercedes-Benz, and Audi — can take up to 45 minutes due to complex module networks. Always wait for the meter reading to fully stabilize before recording your measurement.
Can a dashcam cause parasitic battery drain?
Yes — and it is one of the most common causes of unexpected battery drain in modern vehicles. A dashcam hardwired directly to an always-on power circuit can draw 200–500 mA continuously, even in parking mode. This can flatten a 60Ah battery in as few as five days. The fix is to wire the dashcam to a switched power source that cuts off with the ignition, or to use a dashcam with a built-in voltage cutoff that stops drawing power when the battery drops below a set threshold (typically 11.6–12V).
Do I need a special multimeter to test for parasitic drain?
You need a digital multimeter with a milliamp (mA) DC current range. This is not available on all meters — basic continuity testers and some entry-level multimeters only go down to amps, not milliamps. Any AstroAI multimeter (DT132A, DM6000AR, or MUS10KRD) includes a mA range. For the fuse voltage-drop method, you additionally need a meter with millivolt (mV) resolution in voltage mode — the DM6000AR and MUS10KRD both qualify.
Will pulling fuses to find the drain cause any damage to my car?
On most vehicles, briefly removing a fuse causes no lasting damage. However, on modern vehicles with complex module networks, pulling certain fuses (particularly those for the ECU, TCM, or infotainment system) can trigger stored fault codes that require a scan tool to clear, or can cause module parameters to reset (requiring recalibration). If you're not comfortable with this risk, use the fuse voltage-drop method (Section 5 above), which requires no fuse removal at all.
My parasitic draw test is under 50 mA but the battery still dies. What else could it be?
A low parasitic drain means the battery is not being discharged by a hidden circuit — but it can still die from two other causes: (1) the battery itself has degraded internal capacity and can no longer hold a charge even though it tests well on a basic voltage check, or (2) the alternator is not recharging it properly during driving. See our companion guide — How to Test a Car Battery and Alternator with a Multimeter — for a complete three-step charging system diagnosis.
Sources: Battery Tender, "Parasitic Battery Drain: How to Find and Fix It" (2025) • UTI, "What Is Parasitic Battery Drain and How to Test It" (Mar 2026) • Fluke, "How to Find Parasitic Battery Drain with a Multimeter" (2025) • Clore Automotive, "Parasitic Draw Testing Guide" (2025) • Reddit r/MechanicAdvice community diagnostics discussions (2024–2025).